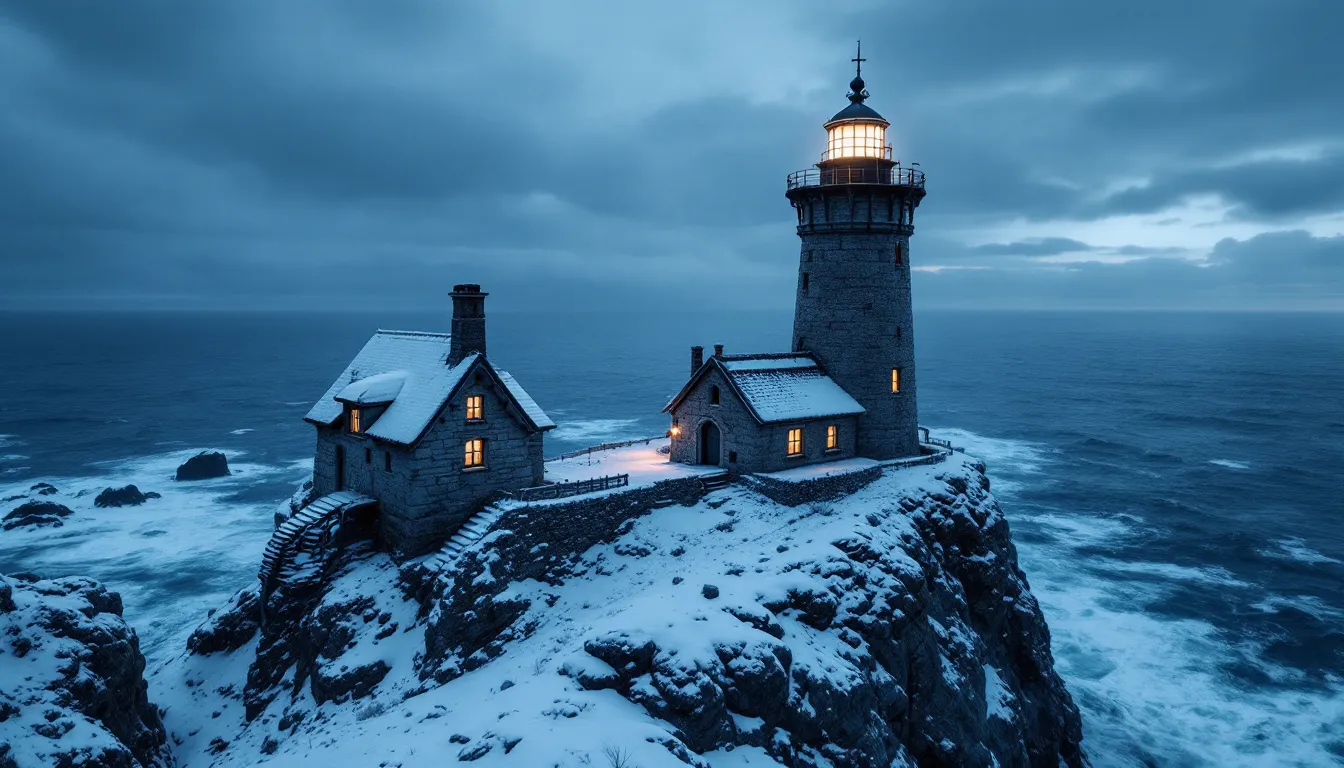
Frostflow Lighthouse sits on Skyrim’s northern coast, a lonely beacon hiding one of the game’s darkest and most emotionally gripping side stories. Unlike the grand questlines filled with dragons and daedric princes, this location tells a quieter, more personal tragedy through environmental storytelling. Most players stumble upon it while exploring the coastal road between Dawnstar and Winterhold, only to find themselves drawn into a mystery that ends in the depths below.
This isn’t a quest that gets handed to you by an NPC with a glowing exclamation mark. Frostflow Lighthouse rewards curiosity and thorough exploration with a narrative that unfolds through journals, placed objects, and the grim aftermath of a family’s final moments. The payoff? A unique spectral encounter and one of the few quests in Skyrim that feels genuinely haunting. Whether you’re a completionist hunting every location or just passing through, this guide covers everything: where to find it, how to survive the threats inside, and how to properly conclude the story.
Table of Contents
ToggleKey Takeaways
- Frostflow Lighthouse is an unmarked side quest on Skyrim’s northern coast between Dawnstar and Winterhold that tells a tragic family story through environmental storytelling and journal entries rather than dialogue.
- The lighthouse harbors a dangerous Chaurus Reaper boss in Frostflow Abyss below, requiring preparation with poison resistance potions and healing supplies to defeat it and recover Habd’s Remains.
- Completing the Frostflow Lighthouse quest by placing Habd’s Remains in the burial urn grants the permanent Sailor’s Repose blessing, which increases Restoration healing spell effectiveness by 10%.
- The quest rewards careful exploration and patience—reading all three of Habd’s journal volumes and examining environmental clues like body placement and abandoned tools reveals how the lighthouse keeper’s family was overcome by Falmer and Chaurus.
- Players should complete the lighthouse tower exploration and collect The Refugees skill book before descending into the abyss, and pull enemies individually rather than fighting groups to manage resources effectively.
- Frostflow Lighthouse exemplifies Skyrim’s best environmental storytelling, delivering meaningful character development and emotional impact through optional discovery rather than forced main questlines.
Where to Find Frostflow Lighthouse
Map Location and Coordinates
Frostflow Lighthouse is located on the northern coast of Skyrim, roughly halfway between Dawnstar and Winterhold. The exact map coordinates place it northwest of Dawnstar, perched on a rocky outcropping overlooking the Sea of Ghosts. If you open your map, look for the coastal road that connects these two cities, the lighthouse sits just off this path, slightly inland from the shoreline.
The structure itself is visible from a distance thanks to its distinctive tower. Unlike many Skyrim locations that require careful searching, Frostflow Lighthouse has a clear visual profile against the snowy landscape. Once you’re within viewing distance of the coast in this region, the lighthouse becomes an obvious landmark.
Best Travel Routes from Major Cities
From Dawnstar, head west along the coastal road. The journey takes roughly 5-7 minutes on foot, following the path as it curves around the shoreline. You’ll pass a few random encounter spots and possibly some mudcrabs near the water. The lighthouse appears on your right as the road bends inland.
From Winterhold, travel southeast along the same coastal road. This route is slightly longer, expect about 8-10 minutes of travel time. The path descends from Winterhold’s higher elevation, and you’ll likely encounter ice wolves or snow bears along the way. Fast traveling to the Shrine of Azura and heading northwest can also work as an alternative approach.
For players based in Whiterun or Solitude, fast travel to Dawnstar offers the quickest access point. There’s no carriage that stops directly at the lighthouse, so walking or horseback remains your only option for the final leg. The location becomes a fast travel point once discovered, making return visits convenient for quest completion.
The Tragic Story Behind Frostflow Lighthouse
The Lighthouse Keeper’s Family
The lighthouse was home to Habd, the keeper, along with his wife Ramati and their two adult children, Mani and Sudi. Through journal entries found throughout the location, you piece together their routine life maintaining the beacon, at least until Habd discovered a hidden cellar entrance beneath the living quarters. What he initially thought might be an old smuggler’s cache turned into something far worse.
Habd’s journal entries shift from curiosity to concern to outright terror. He mentions strange sounds from below, Sudi’s growing obsession with exploring the depths, and eventually the family’s desperate attempt to flee. The final entry, dated just days before you arrive, reveals their plan to abandon the lighthouse permanently. They didn’t make it.
The bodies tell the rest of the story. Ramati and Mani lie dead in the living quarters, while Sudi’s remains are found deeper in the caves below. Habd himself is nowhere to be found initially, his fate is revealed only once you venture into the deepest chambers of what’s labeled as Frostflow Abyss.
Unraveling the Mystery Through Environmental Storytelling
Bethesda’s environmental design does heavy lifting here. Blood trails lead from the cellar entrance toward the bedrooms. Overturned furniture and scattered belongings indicate a struggle. A child’s toy sits abandoned near one of the bodies, small details that build atmosphere without a single line of dialogue.
The journals provide context, but the placement of bodies and items creates the timeline. Sudi ventured too deep and likely alerted the Falmer and Chaurus inhabiting the caves. The family tried to barricade themselves in the upper floors, but the creatures broke through. Many players note that this location exemplifies environmental storytelling in ways that rival some of the game’s major questlines, proving that sometimes the most memorable content comes from optional discoveries.
Step-by-Step Walkthrough of Frostflow Lighthouse
Exploring the Exterior and Lighthouse Tower
Approach the lighthouse from the road side. The exterior appears quiet, no enemies spawn outside in the initial area. The main entrance leads directly into the ground-floor living quarters, while a separate door on the exterior wall provides access to the lighthouse tower itself.
Climb the tower first if you want a complete sweep. The spiral staircase leads to the beacon chamber at the top, where you’ll find some minor loot and a clear view of the surrounding coastline. No enemies occupy the tower, making it a safe zone. The real interest lies in the living quarters below.
Investigating the Living Quarters
Enter the main building to find the central living space. Ramati’s body lies near the entrance, with Mani’s remains in one of the back rooms. Search the area thoroughly, Habd’s Journal sits on a table near the fireplace, providing the first pieces of the story. Read all three volumes you find scattered throughout the location for the complete narrative.
The cellar entrance is in the floor of the main room, beneath a trap door. It’s unlocked and leads down into a small storage area that connects to a much larger cave system. Stock up on potions and check your gear before descending, you won’t be returning to the surface until you clear the entire dungeon.
Descending Into Frostflow Abyss
The caves below are designated as Frostflow Abyss, a separate interior cell from the lighthouse proper. Initial chambers contain Chaurus enemies, the standard variety you’ve likely encountered in other Falmer dungeons. They deal poison damage, so poison resistance potions or enchantments help significantly.
As you push deeper, Falmer join the enemy roster. The cave system isn’t particularly large compared to major dungeons, but the tight corridors and multiple elevation changes create ambush opportunities. Listen for the distinctive clicking sounds that signal Chaurus nearby, and watch for Falmer archers on elevated platforms.
Sudi’s body is found in one of the middle chambers, surrounded by Chaurus egg sacs. Loot it for a journal entry that provides her perspective on the discovery. The path continues downward into a larger cavern, the boss chamber.
Combat Strategy: Fighting the Chaurus Reaper
The deepest chamber holds a Chaurus Reaper, the only one in this location and the primary threat. Chaurus Reapers are tougher variants with higher health pools and more aggressive attack patterns than standard Chaurus. They close distance quickly and deal significant melee damage.
Habd’s remains lie in this chamber, partially consumed by the Reaper. Your objective is to defeat it and retrieve Habd’s remains from its vicinity. Combat strategies depend on your build:
- Melee builds: Keep moving to avoid the Reaper’s acid spit ranged attack. Circle strafe and strike between its attack animations. Stamina management is critical, don’t drain your bar completely or you can’t dodge effectively.
- Ranged builds: The cavern provides enough space to maintain distance. Use cover from the rock formations to break line of sight when needed. Fire-based damage works well since Chaurus have no particular resistances.
- Magic users: Destruction spells are straightforward, but the Reaper can close gaps fast. Summon a tank companion or atronach to draw aggro while you deal damage from safety. Frost spells slow its movement, buying you more kiting room.
The Reaper doesn’t respawn, and once defeated, you’re free to loot the chamber. Habd’s Remains appear as a quest item in the Reaper’s area, pick them up to trigger the next quest stage.
Essential Loot and Rewards at Frostflow Lighthouse
Habd’s Remains and the Unique Quest Item
Habd’s Remains serve as the key quest item. Once collected from the Chaurus Reaper’s chamber, they enable the final stage of the location’s story. Unlike typical quest items that clutter your inventory until completion, these remains carry narrative weight, you’re literally carrying the lighthouse keeper to his final rest.
The remains don’t have a weight value and can’t be dropped until the quest resolves. This is standard Skyrim quest item behavior, but it’s worth noting if you’re managing carry weight carefully during the dungeon crawl.
Skill Books and Valuable Items
Frostflow Lighthouse contains one skill book: The Refugees, which increases your Speech skill by one point. It’s located on a bookshelf in the living quarters, easy to miss if you’re rushing through. Grab it before descending into the abyss, since returning upstairs mid-dungeon breaks the pacing.
Other notable loot includes:
- Leveled gold scattered throughout the living quarters and cave system
- Potions and ingredients in the storage area near the cellar entrance
- Chaurus eggs in the cave chambers (useful for alchemy)
- Falmer ears and Chaurus chitin from enemy drops (standard crafting materials)
- Minor enchanted weapons or armor from the Reaper’s chamber (level-dependent)
The loot isn’t exceptional compared to major dungeons, but the skill book and moderate gold make the location worthwhile beyond the story elements. Players focused on completionist achievements will want the skill book for their collection.
Completing the Frostflow Lighthouse Quest
Returning Habd’s Remains to His Burial Site
Once you have Habd’s Remains, exit Frostflow Abyss the way you came. The path loops slightly, so follow the quest marker if you’re unsure. Return to the surface through the cellar entrance, then exit the lighthouse building entirely.
The quest marker directs you to a small burial site behind the lighthouse, overlooking the sea. You’ll find a Burial Urn specifically marked for Habd. Activate it to place his remains inside. This triggers the next and final stage of the quest.
The Spectral Guardian Encounter
After placing the remains, Habd’s Shade appears, a ghostly blue spectral form of the lighthouse keeper. Unlike hostile ghosts encountered elsewhere in Skyrim, this shade is peaceful. He acknowledges your help in reuniting him with his family’s resting place.
The shade doesn’t offer dialogue options or extended conversation. Instead, he provides a brief moment of recognition before turning toward the burial site. It’s one of the few genuinely somber moments in Skyrim’s side content, relying on atmosphere rather than exposition.
Unique Rewards for Completing the Quest
Habd’s Shade grants a permanent blessing called Sailor’s Repose. This is a unique buff that doesn’t appear anywhere else in the game:
- Effect: Healing spells cure 10% more health
- Duration: Permanent
- Stacks: Yes, with other Restoration bonuses
The blessing applies to all Restoration healing spells, including ones from the base game and DLC content. For builds that rely on self-healing (Restoration mages, tanky paladins, etc.), this represents a meaningful permanent bonus. It doesn’t appear in your active effects menu but functions silently in the background.
Many guides from sources like Twinfinite highlight Sailor’s Repose as one of the better hidden blessings in Skyrim due to its permanent nature and lack of drawbacks. Unlike temporary shrine blessings that disappear when you contract diseases or worship other divines, this buff persists indefinitely once obtained.
Enemy Types and Recommended Character Levels
Understanding Chaurus and Falmer Threats
Frostflow Abyss contains two primary enemy types: Chaurus and Falmer. Both scale to your character level within defined ranges, but understanding their behavior patterns matters more than raw stats.
Chaurus deal poison damage with both melee attacks and ranged acid spit. Their poison damage-over-time effect can stack if you take multiple hits without healing. Poison resistance gear or potions mitigate this significantly. They’re vulnerable to fire damage and have no particular immunities.
Falmer are blind but detect you through sound and proximity. Sneak builds can navigate around them if they avoid sprinting or knocking over objects. Falmer archers pose the bigger threat in the cramped cave corridors, prioritize them over melee variants when multiple enemies engage simultaneously.
The Chaurus Reaper is a unique spawn with roughly double the health pool of standard Chaurus. It functions as the location’s boss encounter and doesn’t scale infinitely, if you’re significantly overleveled, it becomes trivial. At appropriate levels (15-25), expect a moderate challenge requiring consumables or tactical positioning.
Optimal Character Build and Preparation
Frostflow Lighthouse is accessible to characters around level 10-15, though lower-level characters can succeed with proper preparation. The dungeon doesn’t gate progression behind level requirements, but the Chaurus Reaper can overwhelm underprepared builds below level 10.
Recommended preparations:
- Healing potions: Bring at least 10-15. The poison damage from Chaurus stacks quickly, and you may not have time to use healing spells mid-combat.
- Poison resistance: Potions, enchantments, or racial abilities (Bosmer have natural poison resistance) reduce Chaurus effectiveness substantially.
- Light source: Torches or the Candlelight spell help in the darker cave sections, though not strictly necessary.
- Ranged option: Even melee-focused builds benefit from a bow or destruction spell for pulling enemies individually rather than fighting groups.
Mage builds should prepare Restoration spells for self-healing between fights. The dungeon isn’t long enough to require magicka management concerns, but running out mid-combat against the Reaper creates problems. Warrior builds need stamina for power attacks and dodging, don’t dump everything into health.
Hidden Secrets and Easter Eggs
The Environmental Clues Throughout the Location
Beyond the obvious journals and bodies, Frostflow Lighthouse contains subtle environmental storytelling elements that reward careful observation. A child’s doll sits on a shelf in Mani’s room, small details that humanize the tragedy. Plates are still set on the dining table, suggesting the family was interrupted mid-meal when the creatures broke through.
In the cellar storage area, you’ll find pickaxes and mining equipment, evidence that Habd initially thought the caves might contain valuable ore deposits. His optimism turned to horror as he realized what actually inhabited the depths. These tools remain abandoned near the entrance to Frostflow Abyss, marking the point where curiosity crossed into danger.
The placement of Sudi’s body deep in the caves, separated from the rest of the family, implies she ventured furthest before being overwhelmed. Her journal entries found near her remains confirm she was the most eager to explore even though her father’s warnings. It’s environmental storytelling that many players from communities like Nexus Mods point to when discussing Skyrim’s best unmarked questlines.
Connections to Other Skyrim Locations and Lore
Frostflow Lighthouse doesn’t directly tie into major questlines, but it shares thematic elements with other Falmer-infested locations throughout Skyrim. The Dwemer ruins and subsequent Falmer occupation represent one of the game’s recurring environmental narratives, civilizations built on hubris meeting dark ends.
The Chaurus Reaper specifically appears in only a handful of locations across base Skyrim and the Dawnguard DLC. Frostflow Lighthouse marks one of the earliest opportunities for most players to encounter this enemy variant, making it memorable beyond the story context.
Some players speculate connections between Habd’s family and other lighthouse or coastal locations, but no explicit lore ties exist in vanilla Skyrim. The story stands alone as a self-contained tragedy, which arguably makes it more impactful. Resources like GamesRadar+ have featured Frostflow Lighthouse in articles about Skyrim’s most emotional side content, often ranking it alongside locations like Anise’s Cabin or the Bard’s Leap Summit for memorable storytelling through environment rather than dialogue.
Common Mistakes and Tips for Success
Missing Habd’s Journals: Players rushing through combat often skip the journals entirely, losing narrative context. All three volumes are in the living quarters, read them before descending to appreciate the full story.
Forgetting the Skill Book: The Speech skill book in the lighthouse is easy to overlook. Check bookshelves thoroughly in the living quarters before heading into the caves. Returning later for one book feels wasteful when it takes 30 seconds to grab during initial exploration.
Not Preparing for Poison Damage: Chaurus poison effects stack and persist. Players without poison resistance or sufficient healing potions find themselves overwhelmed quickly, especially at lower levels. Stock up in Dawnstar before making the trip.
Ignoring Habd’s Remains After Combat: The quest doesn’t auto-complete after defeating the Chaurus Reaper. You must manually pick up Habd’s Remains from the chamber, then return to the surface to access the burial site. Some players clear the dungeon and leave without triggering the final quest stages, missing Sailor’s Repose entirely.
Fighting Multiple Enemies at Once: The cave system’s layout allows you to pull enemies individually if you use ranged attacks carefully. Fighting groups of Chaurus and Falmer simultaneously drains resources fast. Take it slow and separate targets when possible.
Not Using the Lighthouse Tower: The tower itself is a safe zone with decent loot. Clear it first for supplies before tackling the dangerous sections below. It also provides a great vantage point to scout the surrounding area for other locations.
Selling Habd’s Remains Before Completion: While quest items typically can’t be removed from inventory, bugs occasionally allow it. If you somehow lose the remains before placing them in the burial urn, the quest becomes incompletable. This is rare but worth noting for heavily modded games.
Speed-Running and Missing the Atmosphere: Frostflow Lighthouse works best when you take time to absorb the environmental storytelling. Rushing through for the Sailor’s Repose buff alone misses the point. Read the journals, examine the scene, and let the tragedy unfold naturally.
Conclusion
Frostflow Lighthouse represents Skyrim’s environmental storytelling at its finest, a complete narrative arc delivered without quest givers, dialogue trees, or objective markers cluttering your screen. The tragedy of Habd’s family unfolds through journal entries, body placement, and the oppressive atmosphere of the caves below. For players willing to explore off the beaten path and piece together the story themselves, it delivers one of the game’s most memorable unmarked quests.
The Sailor’s Repose blessing provides lasting mechanical benefit, making the location worthwhile even for min-maxers focused purely on character optimization. But the real reward is the story itself, a reminder that some of Skyrim’s best content comes from locations you weren’t sent to find. The lighthouse stands as a lonely testament to curiosity turned fatal, and your intervention at least grants Habd the dignity of a proper burial alongside his family.
Whether you’re exploring the northern coast for the first time or revisiting locations on a new playthrough, Frostflow Lighthouse deserves more than a quick dungeon clear and fast travel away. Take the time to read the journals, examine the scene, and complete the burial rite. It’s one of those rare moments where Skyrim feels less like a game and more like a world with stories that existed before you arrived, and will echo long after you leave.